Configure NTLM based authentication

Assuming that the NTLM server details have been set and that the Protex server has been successfully joined to the AD Domain the next step is to assign Protex filter profiles to the relevant AD groups. At least one group/filter pair must exist before NTLM authentication will work correctly.
If you only want to log usernames and not change filtering profile by the user's NTLM group you still need to add an entry here. Just assign any group to the same profile that is used for the default.
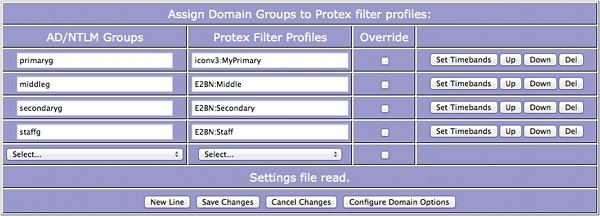
Initially the dialogue box will appear as above with no domain/filter pairs (a mapping). To set up a new mapping click on the New Line button. The drop-down menu on the LHS contains a list of all the available NTLM groups while the RHS menu contains a list of filter profiles. Select a group from the LH menu and the profile you want to assign to users in that group from the RHS menu.
Click New Line to continue or Save changes.

The order in which these mappings are listed is important if a user can appear in more than one AD group. For example, you may assign Domain Users to one profile but want to assign a different profile to the Staff group. As members of the Staff group will also be in the Domain Users group the order is important: the first matching line (from the top down) is the one that is applied to a particular user. So, in the example above, the staff line must come above the domain users one.
Ticking the Override box will allow users in this AD Group to change their profile - this should only be used for teaching or technical staff and not students! When ticked the logged in window will have a dropdown menu listing the other available filter profiles: selecting one will immediately change the user's active profile. This will allow staff to check whether sites they want to use in class are available on the student profiles and, if not, they can then ask the local Protex administrator to make the necessary list changes.
The up/down buttons can be used to re-order lines already entered and click the Delete button to remove a mapping.
NOTE1: the Set Timebands button will only appear when at least one timeband has been created. See Setup Timebands for instructions on how to set up and use timebands.
NOTE2: If a timeband is deleted in the Setup screen references to it are not removed from the mappings displayed on this screen. However, references to non-existent timebands are ignored.
Save changes
Can be clicked at any time to save the currently displayed settings.
Cancel changes
Will restore the screen to the most recently saved settings: i.e. any changes made since Save changes was last selected will be lost.
Configure domain options
Takes you to the page where the NTLM server settings are entered. Once configured this should only be required if there are changes to the AD server or domain admin user details.
Set timebands
Used to set up any time specific profiles for this group. The cross and tick indicate whether any timebands have already been applied to this mapping.