Authentication Login Options
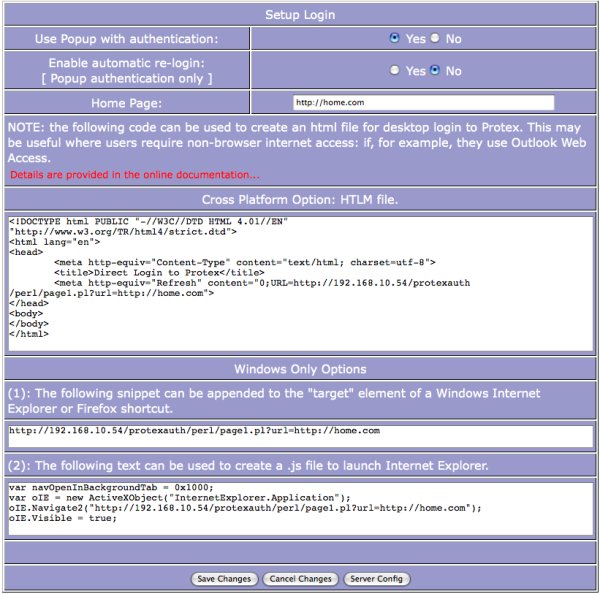
Use Popup with Authentication:
The mechanism used by Protex to maintain a user's authentication status requires a browser window to be open at all times*. This option allows a site to choose how this window is created.
The default method is to use what is known as a 'Popup' window. Just to restate, this window should not be closed by the user: if it is, a re-login may be required (see next item) and it will certainly reappear after a couple of minutes.
Some schools, however, block popups either via a Group Policy setting or various browser plug-ins. Even if popups are blocked generally it may be possible to allow them from the Protex server centrally using a Group Policy. But not in all cases. If you are not able to unblock popups then by setting this item to no a non popup version of the authentication mechanism can be used. The 'non popup' version does require this extra click from the user but the underlying mechanism is the same and it is important to note that, as before, a new window is generated which must be kept open: if it is closed a re-login will be required after a couple of minutes.
Note that even if you do not block popups you may prefer this scheme - please feel free to choose whichever you like best.
*One reason for the Login window is to reduce the load placed on the Protex server and local network by the NTLM protocol. NTLM requries every TCP/IP connection to be separately authenticated. Protex will use persistent connections with NTLM but even so, on a busy page with lots of objects, this can mean that perhaps 20 connections must be opened and authenticated by the Protex server. Persistent connections do time out after a short time (between 10-15 seconds) so that in many cases when a user wishes to open a new web-page all the existing connections will be closed and another set will need to be opened and authenticated. Protex avoids this connection issue by putting in place a separate mechanism which requires only a single NTLM authentication every five minutes. Other reasons for this Login window are related to existing and planned facilities (e.g. using timebands) which require this more flexible approach to authentication.
Enable automatic re-login:
If popups are enabled it is possible to enable (yes) or disable (no) automatic re-login. What this does is allow a user to be automatically logged back into the Protex system if the popup window has been closed by the user. There are both advantages and disadvantages to this option. If enabled then if a user closes the popup it will reappear but will not prompt the user to log back in again. This can be an advantage but, on the other hand, it does not train the user not to close the popup and its reappearance may appear to be just an annoyance.
With this option disabled when the popup reappears the user is prompted to login again. The possible advantage to this is that the the user will soon learn not to close the window.
The choice is yours - do whichever seems best for your users.
Note that automatic re-login is NOT available when popups are disabled.
Home Page:
What follows offers system administrators code to provide their users with a shortcut, html or JavaScript file (for brevity future references to shortcut will imply all of these) which can be placed on the users' desktop or in their startup items folder to log into Protex without having to explicitly open a browser.
This may be useful when using standalone email clients, RSS readers, etc. that are not able to authenticate with the Protex server independently. Some schools have, for example, reported that the remote elements of HTML emails are not being rendered correctly by Outlook until they have launched a browser and logged into the Protex filtering system.
Assuming for the moment that the shortcut has been created (see below):
if the shortcut is put into the startup items folder users need take no further action: it will be run as part of the normal login process lauching the browser, opening the popup, and loading the home page
if the shortcut is put onto the desktop then the user need only double click on it to open the browser, popup and home page as before
If the Home page is not set then in most cases the main window will close leaving just the small Login window open: due to browser limitations, versions, security settings, etc. this will not work in all cases. For example, by default Firefox does not allow windows to be closed by JavaScript which have not been opened by it. There is a workaround to this (see below) but it does have security issues and is not generally recommended.
HTML File (cross-platform):
The most cross platform method of providing a direct login shortcut is to create an html file and place this on the user's desktop. The code given here can be cut and pasted into any text editor and saved as a .html or .htm file. This page will redirect the user's browser to the login page on the Protex server and send the home page in the query string. On Widows PCs this file can be put into the Startup items folder to be launched automatically when users first log in.
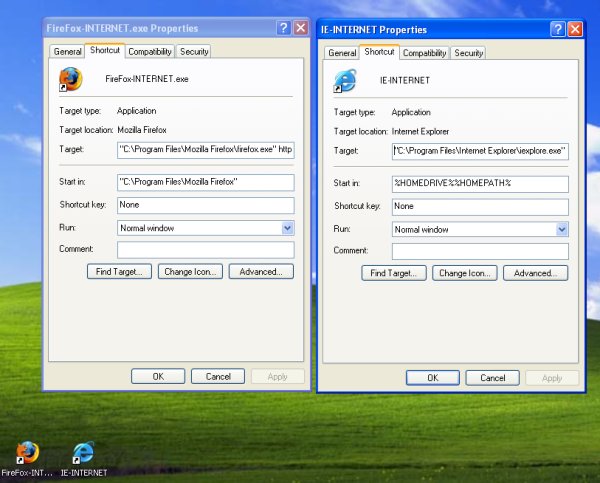
Shortcut target (Windows only):
As an alternative Windows users can use a shortcut to the browser .exe. Right click to open its Properties. Now enter a space at the end of the 'target' (after the quotes) and append this line. The shortcut will now open the browser and go to this URL. This will work with shortcuts to both IE and Firefox. This file can be put into the Startup items folder to be launched automatically when users first log in.
JavaScript file (.js) (Windows/Internet Explorer only):
This is another option for Windows/IE users. Open Notepad, copy this code into a blank document and save as a file with the .js extension. This will work best when placed inside the Start Items folder of the user's profile so that it is run whenever the user logs into a PC. As above it will open IE, open the popup menu (prompting the user to accept the AUP if necessary) and either close the main window if no home page has been set or load the home page if it has.
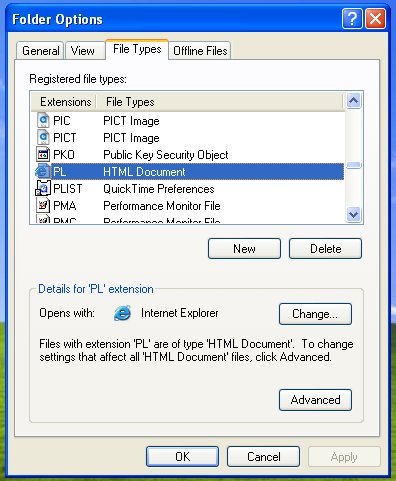
NOTES: This can be quite fiddly to set up and get working as expected. If it does not work then here are a few things to check.
- Does your computer (PC) recognise that .pl files are HTML pages? Go to Control Panel->Folder Options->File Types. Add "PL" as an HTML document
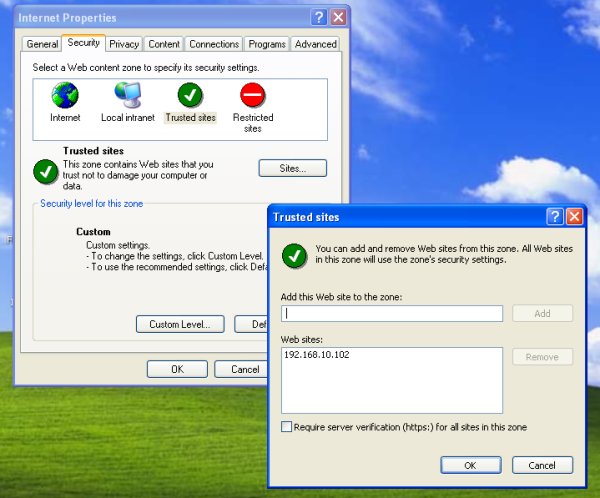
- Is the IP address of the Protex server in IE's TRUSTED sites list? Go to Control Panel->Internet Options->Security
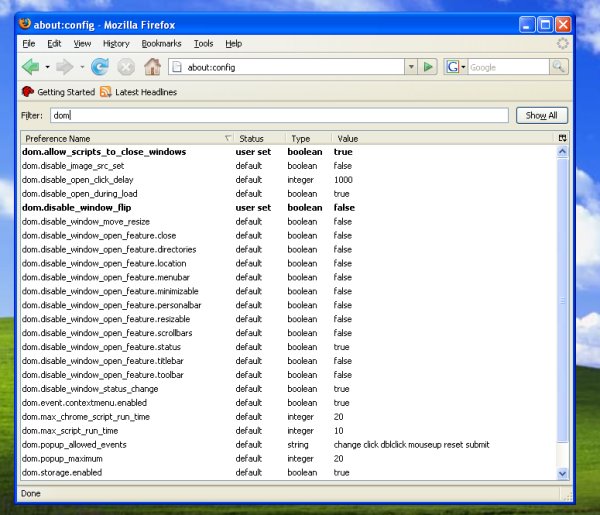
- When using Firefox the main window remains open even when no home page has been set. By default Firefox does not allow the main window to be closed by JavaScript. There is a setting which can be changed to allow this behaviour. To test it enter
about:configin the URL address bar. Then search fordom.allow_scripts_to_close_windowsand click it so that its value changes from false to true. In order to make this change for all users auser.jsscript with this setting must be placed in the Mozilla/Firefox profile of each user (see http://kb.mozillazine.org/User.js_file for details)
IE keeps asking me if I want the main window to close! This is correct IE behaviour - it brings up an alert when JavaScript tries to close a window it has not opened
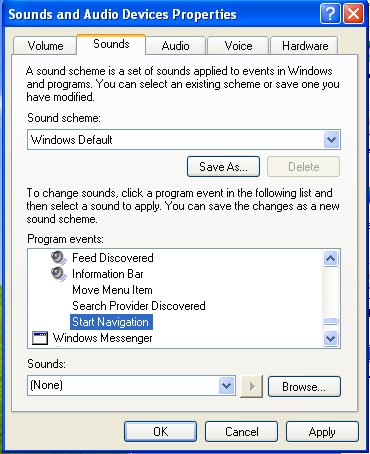
IE keeps clicking when the Login window refreshes!. This is a Windows/IE setting. It can be turned off as follows. Go to Control panel->Sounds and audio devices. Click on the
Soundstab and explore the Program events until you get to theWindows Explorersection. Select theStart Navigationitem and select (none) in the Sounds drop-down at the bottom of the dialogue box. It should be possible to set this via a Group Policy
Save Changes:
Click to save any changes made.
Cancel Changes:
Click to cancel any changes made and restore the screen to the last saved state.
Server Config:
Click to go to the Server Configuration screen.